
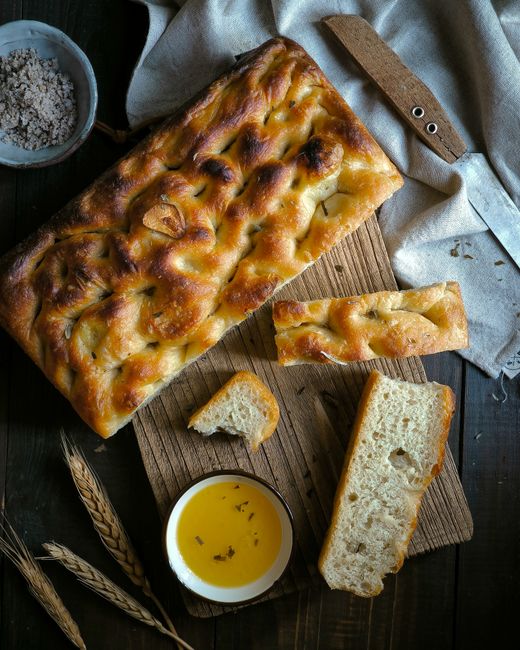
No Knead Big Bubble Focaccia
No Knead Big Bubble Focaccia: A Foolproof Guide to Airy, Irresistible Bread
The allure of homemade focaccia lies in its rustic charm and incredibly satisfying texture. For many, the dream of achieving those coveted big bubbles and an impossibly airy crumb is marred by the perceived complexity of traditional bread-making. However, the advent of the no-knead method has democratized the art of bread, and no recipe exemplifies this more beautifully than no-knead big bubble focaccia. This approach strips away the need for laborious kneading, relying instead on time, hydration, and a touch of strategic encouragement to develop gluten and achieve that signature open crumb. This article will guide you through every step, from selecting the right ingredients to mastering the techniques that guarantee a no-knead big bubble focaccia every single time, optimized for search engines to help you find this culinary treasure.
Understanding the No-Knead Phenomenon for Focaccia
The core principle behind no-knead bread is the high hydration level. Unlike traditional recipes that often call for less water and extensive kneading to develop gluten structure, no-knead recipes utilize a significantly higher ratio of water to flour. This excess water hydrates the flour proteins, allowing them to interact and form gluten strands with minimal physical manipulation. For focaccia, this high hydration is particularly beneficial. It contributes to the bread’s characteristic moistness, its tender interior, and, crucially, the formation of those large, irregular air pockets that define "big bubble" focaccia. The long fermentation period, another hallmark of no-knead baking, further aids gluten development through enzymatic activity and allows wild yeasts (if using a starter) or commercial yeast to produce flavor compounds. This extended resting time is where the magic truly happens, transforming a simple mixture of flour, water, yeast, and salt into a dough capable of extraordinary expansion.
Essential Ingredients for Big Bubble Focaccia
Achieving the perfect no-knead big bubble focaccia hinges on using the right ingredients. The quality of these components directly impacts the final texture, flavor, and rise of your bread.
Flour: The foundation of any bread is its flour. For no-knead focaccia, a high-protein bread flour is highly recommended. Bread flour typically contains around 12-14% protein, which translates to stronger gluten development. Stronger gluten is essential for trapping the gases produced by yeast during fermentation and baking, leading to those desirable big bubbles. All-purpose flour can be used, but it may result in a less open crumb and slightly less structural integrity. Avoid low-protein flours like cake or pastry flour, as they will not produce the necessary gluten network. If you’re feeling adventurous and seeking deeper flavor, consider incorporating a small percentage (10-20%) of whole wheat flour or a flavorful flour like semolina for added texture and nuttiness.
Water: The hydration level is paramount. No-knead focaccia typically boasts a hydration of 75-85% or even higher. This means that for every 100 grams of flour, you’ll use 75-85 grams (or more) of water. The water should be lukewarm, around 95-105°F (35-40°C). This temperature is ideal for activating yeast without killing it. The high water content will make the dough feel very wet and sticky, which is precisely what you want. Don’t be tempted to add more flour to make it manageable; embrace the wetness, as it’s the secret to the big bubbles.
Yeast: For a quick and reliable rise, active dry yeast or instant yeast is commonly used. For a standard recipe yielding one large focaccia, 1 to 2 teaspoons of yeast is usually sufficient. If you prefer a more complex flavor profile and don’t mind a longer fermentation, you can use a sourdough starter. When using a sourdough starter, adjust the amount of yeast accordingly, typically replacing some of the flour and water in the recipe with your active starter. Ensure your yeast is fresh for optimal leavening.
Salt: Salt is not just for flavor; it plays a critical role in bread-making. It controls yeast activity, strengthens gluten, and enhances the overall flavor. Fine sea salt or kosher salt works best. A typical amount is 1.5-2% of the total flour weight. Too little salt will result in a bland loaf with an overly aggressive rise, while too much can inhibit yeast activity.
Olive Oil: Good quality extra virgin olive oil is essential for focaccia. It imparts a rich flavor, contributes to a tender crumb, and helps create that signature crispy exterior. You’ll use it in the dough, for coating the pan, and for drizzling over the top before baking. The type and quality of olive oil will significantly influence the final taste of your focaccia, so choose one you enjoy.
The No-Knead Method: A Step-by-Step Breakdown
The beauty of the no-knead method lies in its simplicity, allowing even novice bakers to produce impressive results.
Step 1: Mixing the Dough: In a large bowl, combine the flour, yeast, and salt. Whisk them together to ensure even distribution. Gradually add the lukewarm water, mixing with a spatula or your hands until a shaggy, cohesive dough forms. It will be very wet and sticky. Scrape down the sides of the bowl to incorporate any dry bits. Resist the urge to add more flour. This is the initial stage of gluten development, where the water begins its work.
Step 2: The Bulk Fermentation (First Rise): Cover the bowl tightly with plastic wrap or a damp kitchen towel. Let the dough rest at room temperature for at least 12 to 18 hours, or even up to 24 hours. During this extended period, the yeast will ferment, producing carbon dioxide gas that creates air pockets, and the gluten will develop naturally through autolysis and enzymatic activity. The dough will significantly increase in volume, appearing bubbly and airy. You’ll notice it becomes less sticky as the gluten network strengthens. The longer the fermentation, the more complex the flavor will be.
Step 3: Shaping and Proofing (Second Rise): Generously oil a baking pan, typically a 9×13 inch or similar rectangular pan. The pan should be deep enough to accommodate the rising dough. Gently pour the fermented dough into the prepared pan. It will be very slack and spread easily. Be careful not to deflate the precious air bubbles. Lightly oil your hands and gently spread the dough to fill the pan as evenly as possible. Again, avoid pressing down too hard. Cover the pan and let the dough proof for another 1 to 2 hours, or until it has doubled in size and appears visibly puffy. During this proofing stage, the dough continues to build structure and airiness.
Step 4: Dimpling and Topping: Once the dough has proofed, it’s time to create the iconic focaccia dimples. Lightly oil your fingertips and gently but firmly press them into the dough, creating deep wells all over the surface. Be careful not to puncture all the way through the dough. These dimples will hold the olive oil and toppings. Generously drizzle good quality olive oil over the entire surface of the focaccia, ensuring it pools in the dimples. You can also sprinkle coarse sea salt, fresh herbs like rosemary or thyme, or even thinly sliced garlic or olives at this stage.
Step 5: Baking for Big Bubbles: Preheat your oven to a high temperature, typically 425-450°F (220-230°C). A hot oven is crucial for creating the burst of heat needed for rapid expansion and the development of those big bubbles. Place the focaccia in the preheated oven and bake for 20-30 minutes, or until it’s deeply golden brown and cooked through. The exterior should be crispy and the interior should sound hollow when tapped.
Step 6: Cooling and Enjoying: Once baked, immediately transfer the focaccia from the pan to a wire rack to cool. This prevents the bottom from becoming soggy. Let it cool for at least 15-20 minutes before slicing. This allows the internal structure to set and the steam to escape, preventing a gummy texture.
Tips for Maximizing Big Bubbles and Flavor
Achieving those Instagram-worthy big bubbles requires a little extra attention to detail and understanding of the factors at play.
- Hydration is Key: Don’t shy away from the high hydration. It’s the single most important factor for big bubbles. If your dough feels impossibly wet, it’s probably just right.
- Long, Slow Fermentation: The extended bulk fermentation is where the magic happens. This allows enzymes to break down starches and proteins, creating a more extensible and elastic gluten network that can trap more gas.
- Gentle Handling: When pouring, spreading, and dimpling the dough, be as gentle as possible. You want to preserve the air pockets created during fermentation.
- High Baking Temperature: A screaming hot oven provides the necessary "oven spring" for rapid expansion.
- Pan Choice: A dark metal baking pan will conduct heat more efficiently than a light-colored glass or ceramic pan, leading to a crispier bottom crust and better oven spring.
- Don’t Underbake: Ensure the focaccia is baked until it’s deeply golden brown. An underbaked focaccia will have a doughy interior and less pronounced bubbles.
- Flavor Enhancements: Experiment with different herbs, spices, and toppings. Roasted garlic, cherry tomatoes, caramelized onions, or a sprinkle of red pepper flakes can elevate your focaccia to new heights.
- The "Patience" Factor: No-knead bread is all about patience. The long fermentation time is non-negotiable for optimal flavor and texture.
Troubleshooting Common Issues
Even with a seemingly foolproof method, occasional issues can arise. Here’s how to address them:
- Dense, Small Bubbles: This often indicates insufficient gluten development or a lack of fermentation time. Ensure you’re using bread flour and allowing for the full 12-18 hour bulk fermentation. Another cause can be aggressive handling of the dough, which deflates the air pockets.
- Soggy Bottom: This is usually due to the focaccia sitting in its own steam after baking. Always transfer to a wire rack immediately. Ensure your oven is hot enough to create a good crisp on the bottom.
- Dough is Too Sticky to Handle: While some stickiness is expected, if it’s unmanageable even with oiled hands, you might have slightly over-hydrated the dough. You can try adding a tablespoon of flour at a time during the initial mixing, but be cautious not to overdo it.
- Lack of Rise: Check your yeast’s expiry date. Ensure your water temperature was appropriate for activating the yeast. A very cold kitchen can also slow down fermentation.
SEO Considerations for "No Knead Big Bubble Focaccia"
To ensure this guide is discoverable by those seeking this specific bread, incorporating relevant keywords naturally throughout the text is crucial.
- Primary Keywords: "no knead focaccia," "big bubble focaccia," "easy focaccia recipe," "homemade focaccia."
- Secondary Keywords: "high hydration bread," "airy focaccia," "crusty focaccia," "rustic bread," "bread flour recipe," "long fermentation bread," "simple bread recipe."
- Long-Tail Keywords: "how to make no knead big bubble focaccia," "best no knead focaccia recipe," "tips for airy focaccia."
By integrating these terms organically into headings, subheadings, and the body of the article, search engines will better understand the content’s relevance and rank it higher for relevant queries. The comprehensive nature of the article, covering ingredients, method, tips, and troubleshooting, also contributes to its SEO value by providing in-depth information that users are searching for.
Conclusion: The Rewarding Journey of No-Knead Big Bubble Focaccia
The creation of no-knead big bubble focaccia is a testament to the power of time and minimal intervention in achieving extraordinary culinary results. This method demystifies artisanal bread-making, making it accessible to everyone. The process, while seemingly simple, is deeply rewarding, culminating in a loaf that is visually stunning, incredibly delicious, and satisfyingly light and airy. By understanding the fundamental principles of high hydration, extended fermentation, and gentle handling, you can consistently produce focaccia that rivals any bakery. Embrace the wet dough, be patient with the fermentation, and enjoy the unparalleled pleasure of a truly magnificent, big-bubble focaccia made in your own kitchen. The SEO-optimized keywords sprinkled throughout this guide are a reminder of how readily this knowledge can be found, enabling more people to embark on this delightful bread-making adventure.