
Host Https Www Allrecipes Com Recipe 17513 No Commercial Yeast Starter
Mastering the Art of Sourdough: A Comprehensive Guide to No-Commercial-Yeast Starter at Allrecipes.com
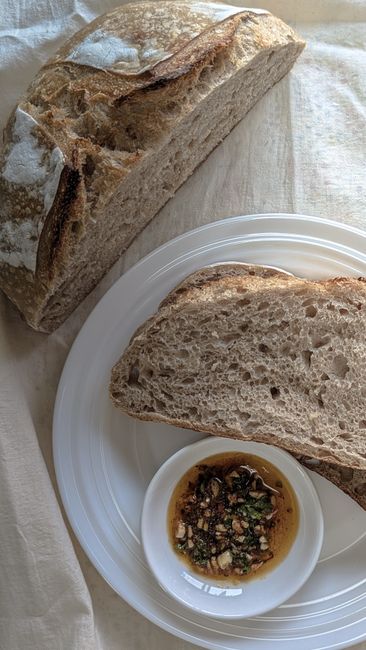
The journey into the world of artisanal bread baking often begins with a single, foundational element: a sourdough starter. Unlike commercially yeasted breads that rely on a manufactured leavening agent, sourdough harnesses the power of wild yeast and beneficial bacteria naturally present in flour and the environment. This guide will delve deep into creating, maintaining, and utilizing a no-commercial-yeast sourdough starter, with a specific focus on the insights and methods often found on platforms like Allrecipes.com, particularly referencing common approaches to achieving success with a starter like the one described at https://www.allrecipes.com/recipe/17513/ which, while potentially a specific recipe, represents a general methodology for developing a wild yeast culture. Understanding the science behind this living organism is crucial, and by following a systematic approach, anyone can cultivate a robust starter capable of producing delicious, tangy, and beautifully textured sourdough bread.
The fundamental principle behind a sourdough starter is the symbiotic relationship between wild yeast and lactic acid bacteria (LAB). Wild yeast, present in flour and the air, consumes sugars in the flour and produces carbon dioxide gas, which leavens the dough, and ethanol. LAB, also naturally occurring, metabolizes sugars and produces lactic acid and acetic acid. These acids contribute to the characteristic tangy flavor of sourdough, lower the pH of the dough, which helps preserve it and improves gluten development, and inhibit the growth of spoilage organisms. Creating a starter is essentially cultivating and nurturing this microbial ecosystem until it becomes active and consistent. The process typically involves a mixture of flour and water, left at room temperature, and regularly fed with fresh flour and water. This feeding schedule provides nourishment for the yeast and bacteria, encouraging their proliferation and activity.
The initial stages of starter creation are critical and require patience. Typically, the process begins by combining equal parts by weight of unbleached all-purpose flour or whole wheat flour and non-chlorinated water in a clean jar or container. Whole wheat flour is often recommended in the early days as it contains more nutrients and microorganisms, potentially speeding up the fermentation process. The mixture should be stirred thoroughly until no dry flour remains, achieving a consistency similar to thick pancake batter. This initial mixture, often referred to as the "mother culture," is then left at room temperature, ideally between 70-80°F (21-27°C), for 24 hours. During this period, you might observe minimal activity, perhaps a few small bubbles, or no visible change at all. This is normal, as it takes time for the wild yeast and bacteria to establish themselves.
After the initial 24 hours, the first feeding takes place. This involves discarding a portion of the existing starter (usually half or more) and replenishing it with fresh flour and water in the same proportions as the initial mixture. Discarding is a crucial step for several reasons. Firstly, it prevents the starter from becoming too large to manage and conserve resources. Secondly, and more importantly, it dilutes waste products and ensures a fresh supply of food for the active microbes, encouraging their healthy growth and preventing the dominance of less desirable microorganisms. The discarded starter can be used in various discard recipes, such as pancakes, crackers, or waffles, minimizing waste. After feeding, the starter is again covered loosely (allowing for air exchange while preventing contaminants) and left at room temperature for another 24 hours.
The subsequent days are a period of observation and consistent feeding. Over the next few days, you will likely begin to notice increasing activity. Small bubbles will appear, and the starter might expand in volume after feeding. The aroma will also evolve, potentially moving from a mild, yeasty smell to something more distinctively sour or vinegary. It’s important to monitor these changes. A truly active starter will reliably double or even triple in volume within 4-12 hours after feeding, will have a pleasant, tangy aroma, and will exhibit a bubbly, aerated texture. The time it takes for a starter to become consistently active can vary, typically ranging from 7 to 14 days, but sometimes longer. Factors such as ambient temperature, the type of flour used, and the specific microbial population in your environment can influence this timeline.
Once a starter exhibits consistent activity – reliably rising and falling, smelling pleasantly sour, and showing abundant bubbles – it can be considered mature and ready for baking. At this stage, the feeding schedule can be adjusted based on how frequently you plan to bake. For regular baking, maintaining the starter at room temperature and feeding it once or twice a day is ideal. However, for less frequent bakers, refrigeration becomes a valuable tool. A mature starter can be stored in the refrigerator for extended periods, typically weeks. When refrigerated, the fermentation process slows down significantly due to the lower temperatures. To revive a refrigerated starter for baking, remove it from the refrigerator and allow it to come to room temperature. Then, perform a couple of regular feedings (discarding and replenishing with fresh flour and water) at room temperature to re-energize the yeast and bacteria before using it in your dough.
The consistency of your starter is a key indicator of its health and readiness. A well-fed, active starter should have a consistency similar to thick pancake batter or a loose paste. If the starter appears too dry, it might not be adequately hydrated, and the microbes may struggle to thrive. If it’s too watery, it might be over-hydrated, which can lead to a less active and more vinegary starter. Adjustments can be made by slightly altering the ratio of flour to water during feedings. For example, if the starter is too thin, use slightly less water in the next feeding. Conversely, if it’s too thick, add a little more water. This fine-tuning ensures optimal hydration for microbial activity.
The type of flour used for feeding also plays a role. While all-purpose flour is a common starting point and can sustain a starter, incorporating whole wheat or rye flour into the feeding routine can boost its vitality. These whole grain flours contain a richer array of nutrients and dormant microorganisms, which can help to re-energize a sluggish starter or add more complex flavor notes to a mature one. Experimenting with different flour blends can lead to unique flavor profiles in your sourdough bread. Some bakers also advocate for using unbleached, stone-ground flours, believing they retain more of their natural microbial content and essential nutrients.
Temperature is a significant environmental factor influencing starter activity. As mentioned, warmer temperatures (70-80°F or 21-27°C) promote faster fermentation and activity, while cooler temperatures slow it down. If your kitchen is consistently cold, you might need to find a warmer spot, such as on top of the refrigerator or in a proofing box, to encourage starter activity. Conversely, in very hot weather, you might need to be more vigilant with feedings to prevent over-fermentation and potential spoilage. Understanding your ambient temperature is crucial for predicting how quickly your starter will become active and how often it will need to be fed.
When it comes to using your active starter in bread recipes, the term "ripe" or "peak" is often used. A ripe starter is one that has been fed and has reached its maximum volume and is beginning to recede. This is the ideal stage to use it in your dough, as it contains the highest concentration of active yeast and bacteria ready to leaven the bread. Using a starter that has fallen significantly might result in a less vigorous rise, while using one that hasn’t reached its peak may lead to an overly acidic flavor and a denser crumb. Observing the rise and fall pattern after feeding is key to identifying the perfect moment for baking.
The initial creation of a sourdough starter can seem daunting, but it’s a process that rewards patience and observation. By understanding the underlying biological processes and consistently following a feeding regimen, you can cultivate a thriving, living culture that will be the foundation for countless delicious sourdough bakes. The insights gained from generalized approaches found on recipe sites like Allrecipes.com, when applied to the fundamental principles of starter maintenance, empower home bakers to achieve the authentic sourdough experience without the need for commercial yeast. This living leaven is not just an ingredient; it’s a testament to the power of natural fermentation and a gateway to a deeply satisfying baking journey.
