
Shortcake Biscuits With Bisquick 2
Mastering Fluffy Shortcake Biscuits with Bisquick: A Step-by-Step Guide to Baking Perfection
The quintessential fluffy shortcake biscuit, a cornerstone of countless dessert dreams, finds its effortless champion in the humble yet mighty Bisquick. This versatile baking mix streamlines the process, transforming what can sometimes be a delicate art into an accessible and rewarding culinary adventure. Whether you’re a seasoned baker or a complete novice, this comprehensive guide will equip you with the knowledge and techniques to consistently produce light, tender, and perfectly golden shortcake biscuits using Bisquick. We will delve into the science behind Bisquick’s magic, explore optimal ingredient ratios and techniques, troubleshoot common pitfalls, and offer creative serving suggestions to elevate your shortcake creations from simple to spectacular. Understanding the fundamental components of a good biscuit – tenderness, flakiness, and a subtle sweetness – is key, and Bisquick provides a reliable foundation for achieving these characteristics. The magic lies in the pre-mixed leavening agents and fats within Bisquick, which simplify the process of creating the delicate crumb structure that defines a superior shortcake biscuit.
The efficacy of Bisquick for shortcake biscuits stems directly from its carefully balanced composition. At its core, Bisquick is a proprietary blend of all-purpose flour, leavening agents (typically baking powder and baking soda), and hydrogenated vegetable oil or shortening. The presence of these pre-measured leavening agents is crucial. Baking powder, a double-acting leavener, provides an initial lift when it comes into contact with moisture and a second, more vigorous lift when exposed to heat in the oven. Baking soda, a base, reacts with acidic ingredients (often present in the liquid you add) to create carbon dioxide gas, further contributing to the rise and airy texture. The pre-existing fat in Bisquick, usually in the form of flakes of shortening, is essential for creating the characteristic tender crumb and flaky layers. Unlike traditional biscuit recipes that rely on cutting cold butter or shortening into flour, Bisquick eliminates this often-fussy step, offering a convenient shortcut without sacrificing quality. The flour provides the structural framework, while the leavening agents work in tandem to expand this framework, creating the lightness we associate with perfect shortcakes. The fat coats the flour particles, preventing excessive gluten development, which would result in tough biscuits, and contributes to a melt-in-your-mouth texture.
To achieve truly exceptional shortcake biscuits with Bisquick, the ratio of Bisquick to liquid is paramount. While Bisquick’s packaging often provides a basic recipe, optimizing it for shortcake requires a slightly different approach. For roughly two cups of Bisquick, a starting point of about 2/3 to 3/4 cup of whole milk or buttermilk is generally recommended. The choice of liquid impacts the final flavor and tenderness. Buttermilk, with its inherent acidity, reacts more vigorously with the baking soda in Bisquick, leading to a slightly more tender and flavorful biscuit with a subtle tang. Whole milk provides richness and contributes to a softer texture. Avoid using skim milk, as it lacks the fat necessary for optimal tenderness. The goal is to create a dough that is shaggy and just comes together, not a wet, sticky batter. Over-mixing or adding too much liquid will inevitably lead to tough biscuits, as it overdevelops the gluten in the flour. The visual cue for perfect consistency is a dough that clumps together when pressed but still retains some dry pockets.
The technique of incorporating the liquid is as vital as the ratio itself. Gentle handling is the golden rule of biscuit making, and this holds true even with the convenience of Bisquick. Begin by placing the Bisquick in a mixing bowl. Create a well in the center. Gradually pour in your chosen liquid, starting with the lower end of the recommended amount. Use a fork or a Danish dough whisk to gently stir the ingredients together. Avoid vigorous stirring or kneading. The aim is to just moisten the dry ingredients until they form a shaggy mass. Once the dough begins to come together, turn it out onto a lightly floured surface. Here, a very light touch is essential. Gently pat or fold the dough a few times, no more than four to five folds, to create layers. Over-folding will also lead to toughness. The goal is to create a cohesive dough that is still slightly lumpy, not a smooth, elastic ball. This minimal handling preserves the delicate structure that Bisquick provides and allows the leavening agents to work their magic without resistance.
Shaping the biscuits is another critical step in achieving that desired shortcake texture. Once the dough has been gently folded a few times, pat it down to about 1/2 to 3/4 inch thickness. Using a round biscuit cutter or even the rim of a glass, cut out your biscuits. It’s important to press the cutter straight down, without twisting. Twisting can seal the edges of the biscuit, preventing it from rising evenly and creating a less defined, potentially denser biscuit. For maximum rise, place the biscuits close together on an ungreased baking sheet. This slight crowding encourages them to rise upwards rather than spreading outwards. Alternatively, for a more rustic look and even more tender edges, you can place them touching each other in a baking pan, allowing them to "hug" each other during baking. The edges of the dough can be gently re-pat and re-cut, but be aware that the last few biscuits will be less tender due to additional handling.
Baking temperature and time are the final determinants of biscuit perfection. Preheat your oven to a relatively high temperature, typically around 400-425°F (200-220°C). This high heat is crucial for a rapid rise and a golden-brown exterior. Place the baking sheet with the shaped biscuits into the preheated oven. Baking time will vary depending on your oven and the size of your biscuits, but generally ranges from 10 to 15 minutes. Keep a close eye on them. You are looking for beautifully puffed-up biscuits that are golden brown on top and on the bottom. A key indicator of doneness is that the sides should appear set and slightly pulled away from the baking sheet. Resist the urge to open the oven door too early, as this can cause the biscuits to collapse. Once baked, remove them from the oven and immediately transfer them to a wire rack to cool slightly. This prevents the bottoms from becoming soggy.
Troubleshooting common biscuit issues is an inevitable part of the learning process, even with Bisquick. Tough biscuits are often the result of over-mixing the dough or over-handling it after adding the liquid. Remember to stir just until combined and fold only a few times. Another culprit can be using too much liquid, which encourages gluten development. Flat biscuits can occur for several reasons. Insufficient leavening (though this is less common with Bisquick if it’s fresh) or the dough being too wet can contribute. If your baking powder is old, it may have lost its potency. Dense biscuits can also stem from overworking the dough or not baking at a high enough temperature for a sufficient rise. Ensure your oven is preheated accurately and that you are not overcrowding the baking sheet. Pale biscuits are usually a sign that they haven’t baked long enough or the oven temperature was too low. Conversely, burnt biscuits indicate the oven temperature was too high or they baked for too long. Understanding these common issues and their causes will help you refine your technique for consistently delicious results.
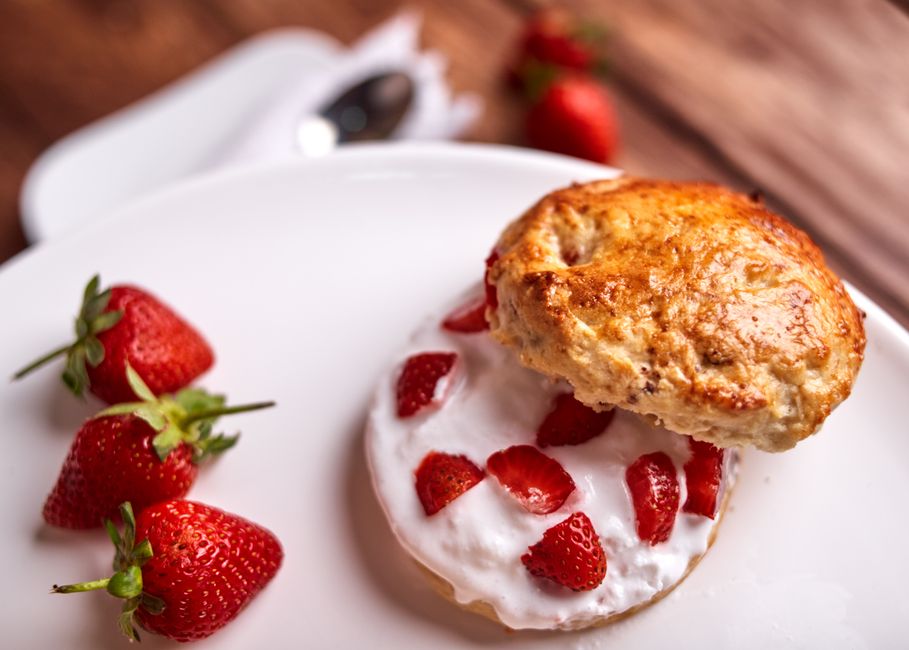
The beauty of Bisquick shortcake biscuits lies in their incredible versatility. While they are the perfect canvas for classic strawberry shortcake, topped with macerated strawberries and whipped cream, their applications extend far beyond. Savory variations are equally delightful. Incorporate finely chopped herbs like chives or rosemary into the dough for a flavorful accompaniment to soups, stews, or roasted meats. A sprinkle of grated cheddar cheese can transform them into cheesy biscuits, ideal for breakfast or as a side dish. For a touch of sweetness without the fruit, try adding a tablespoon or two of granulated sugar to the Bisquick before adding the liquid, and serve them warm with a drizzle of honey or a dollop of sweetened whipped cream. These biscuits can also be split horizontally and used as bases for mini quiches or savory egg dishes. Experimentation is encouraged; the inherent simplicity of Bisquick allows for endless customization. The texture lends itself well to absorbing flavorful toppings, making them a receptive base for both sweet and savory endeavors.
In conclusion, mastering fluffy shortcake biscuits with Bisquick is an achievable and highly rewarding culinary endeavor. By understanding the science behind Bisquick’s effectiveness, adhering to precise liquid ratios, employing gentle handling techniques, and paying close attention to baking parameters, you can consistently produce light, tender, and flavorful biscuits. From the initial mixing to the final golden crust, each step plays a crucial role. Embrace the simplicity of Bisquick, but don’t shy away from refining your technique. With a little practice and attention to detail, these Bisquick shortcake biscuits will become a staple in your baking repertoire, ready to be transformed into countless delicious sweet and savory creations. The ease of preparation offered by Bisquick, when combined with sound baking principles, unlocks a world of culinary possibilities, ensuring that delicious, homemade shortcake biscuits are always within reach.
