
Super Easy Rosemary Bread Machine Bread
Super Easy Rosemary Bread Machine Bread: Aromatic Perfection in Every Loaf
This article provides a comprehensive guide to creating incredibly simple yet exquisitely flavorful rosemary bread using a standard bread machine. We will delve into the essential ingredients, the straightforward process, troubleshooting tips, and serving suggestions, ensuring you can achieve consistently delicious results with minimal effort. Rosemary, with its piney, slightly peppery aroma and taste, complements the hearty texture of homemade bread beautifully, making this recipe a guaranteed crowd-pleaser or a delightful treat for yourself. Forget complex kneading and proving; the bread machine handles all the heavy lifting, allowing you to enjoy freshly baked, aromatic bread with astonishing ease.
The foundation of any successful bread machine recipe lies in accurate ingredient measurement. For this super easy rosemary bread, the primary ingredients are flour, water, yeast, salt, and sugar, with fresh or dried rosemary taking center stage for its flavor infusion. We recommend using a good quality bread flour, as its higher protein content contributes to a better crumb structure and a chewier texture, though all-purpose flour can also be used in a pinch. The type of yeast is crucial; instant yeast (also known as rapid-rise or bread machine yeast) is specifically designed for bread machines and offers the fastest activation and leavening. Active dry yeast can be used, but it often requires proofing separately in warm water, adding an unnecessary step to our "super easy" goal. Water temperature is also critical for yeast activation. Aim for lukewarm water, generally between 105°F and 115°F (40°C to 46°C). Water that is too hot will kill the yeast, while water that is too cold will result in sluggish leavening. The sugar in the recipe not only adds a subtle sweetness but also feeds the yeast, promoting its growth. Salt is essential for flavor and also controls the rate of yeast fermentation, preventing the dough from rising too quickly and developing an undesirable texture. Finally, the star of the show, rosemary, can be used fresh or dried. Fresh rosemary offers a more vibrant, nuanced flavor, while dried rosemary provides a more concentrated aroma. The amount can be adjusted to personal preference, but a good starting point is 1 to 2 tablespoons of finely chopped fresh rosemary or 1 to 2 teaspoons of dried rosemary.
The process for making this super easy rosemary bread machine bread is remarkably straightforward, primarily involving adding ingredients to the bread machine pan in the correct order. Most bread machines have a recommended order for adding ingredients, typically liquid ingredients first, followed by dry ingredients, and then yeast last, placed in a small well on top of the dry ingredients to prevent premature contact with the liquid. This order helps ensure the yeast activates properly and the ingredients combine smoothly. For our rosemary bread, this means starting with the lukewarm water. Next, add the sugar, salt, and then the flour, ensuring the flour completely covers the liquid. Create a small indentation in the center of the flour and carefully add the instant yeast into this well. If using fresh rosemary, chop it finely and add it to the pan along with the flour. If using dried rosemary, you can often add it with the dry ingredients, or some bread machine recipes suggest adding herbs during the final kneading cycle or with the raisins/add-ins. For simplicity and maximum flavor infusion, adding it with the dry ingredients is usually sufficient for a noticeable rosemary presence. Once all ingredients are in the pan, secure the lid and select the appropriate bread machine cycle. For most white or basic bread settings, a "Basic," "White," or "Standard" cycle will work perfectly. These cycles typically include a kneading phase, a first rise, a second rise, and a baking phase, all automated by the machine. The typical cycle duration can range from 2.5 to 4 hours, depending on the machine and the selected cycle.
One of the most significant advantages of using a bread machine is its ability to handle the entire bread-making process from start to finish, eliminating the need for manual kneading and proving. The kneading process in a bread machine is crucial for developing gluten, the protein network in flour that gives bread its structure and chewiness. The machine’s paddles repeatedly mix and knead the dough, mimicking the actions of a baker’s hands. Following the kneading, the dough undergoes several rising periods. The first rise allows the yeast to ferment, producing carbon dioxide gas, which causes the dough to expand. The second rise, after the dough has been punched down by the machine, further develops the flavor and texture before the baking phase. The baking phase is where the magic truly happens, as the bread machine heats up and bakes the dough to a golden-brown perfection. The aroma of rosemary filling your kitchen during this stage is a testament to the simple yet profound pleasure of homemade bread. Ensure your bread machine is placed on a stable, flat surface and that the power cord is securely plugged in. Avoid moving the machine once the cycle has begun, as this can disrupt the dough’s development.
Troubleshooting common bread machine issues is essential for consistent success. One prevalent problem is a bread that is too dense or heavy. This can be caused by using too much flour, too little yeast, or water that was too hot or too cold. Always measure flour accurately by spooning it into the measuring cup and leveling it off with a straight edge; scooping directly from the bag can lead to an over-measurement of flour. Another issue is a bread that collapses or has a sunken top. This often indicates that the dough over-proofed, meaning the yeast had too much time to ferment before baking. This can happen if the ambient temperature is too warm or if there was too much yeast or sugar. Conversely, a bread that is pale and undercooked might suggest insufficient baking time or a faulty heating element in the bread machine. Many machines offer crust color settings (light, medium, dark) and loaf size options. Selecting the correct settings for your desired outcome is vital. If your bread consistently has a very hard crust, try using the "light" crust setting or lightly brushing the top of the loaf with melted butter or milk immediately after removing it from the machine. For a bread that doesn’t rise properly, double-check your yeast’s expiration date and ensure the water temperature was within the correct range. Sometimes, environmental factors can play a role; very cold kitchens can slow down yeast activity.
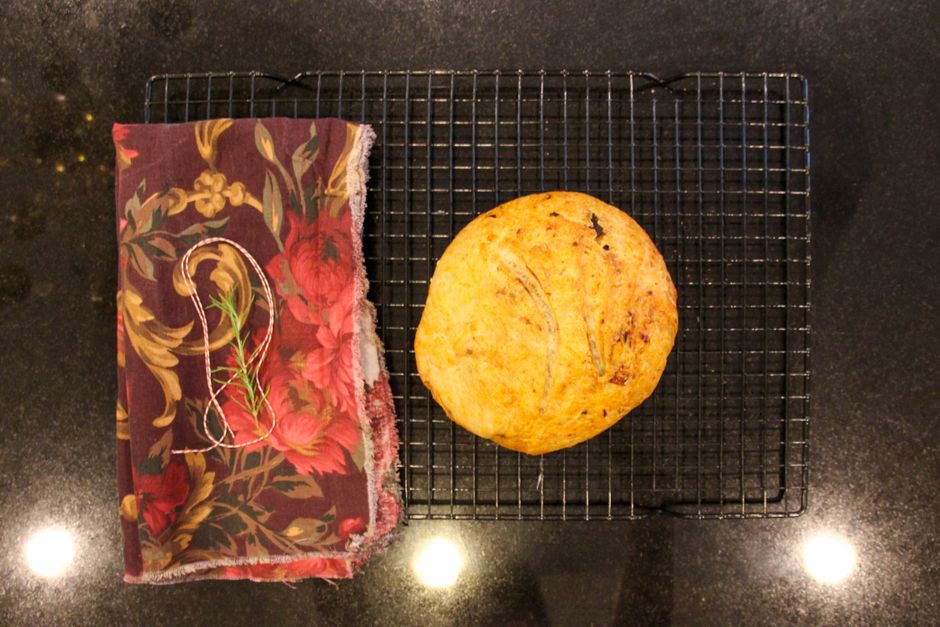
Customization and variations on this super easy rosemary bread machine bread are numerous, allowing for endless culinary exploration. For an even richer flavor, you can experiment with different types of flour. A blend of bread flour and whole wheat flour can add a nutty depth, though it might require slightly more liquid. Adding a tablespoon or two of finely grated Parmesan cheese to the dry ingredients can create a savory rosemary-Parmesan bread that pairs wonderfully with Italian dishes. For a touch of sweetness and a different textural element, consider adding a tablespoon of honey or maple syrup instead of sugar, or incorporating a few tablespoons of toasted pine nuts or chopped walnuts along with the rosemary. If you prefer a softer crust, you can remove the loaf from the bread machine immediately after the baking cycle finishes and place it on a wire rack. For a slightly more intense rosemary flavor, you can add a small amount of fresh rosemary to the dough during the last five minutes of the final kneading cycle. Many bread machines have an "add-in" compartment that automatically dispenses ingredients like nuts or seeds at the appropriate time; for rosemary, it’s often best to add it with the dry ingredients to ensure even distribution.
Serving suggestions for this versatile rosemary bread are as abundant as its flavor. It’s excellent served warm, straight from the bread machine, with a generous smear of good quality butter. The warmth and aroma are simply irresistible. This bread is a perfect accompaniment to a wide range of meals. It pairs beautifully with hearty soups and stews, such as lentil soup, minestrone, or beef stew, where its robust flavor can stand up to the rich broths. For Italian dinners, it’s ideal for mopping up pasta sauces or serving alongside roasted meats and vegetables. A simple bruschetta can be elevated by using slices of this rosemary bread toasted and topped with fresh tomatoes, garlic, basil, and a drizzle of olive oil. It also makes a fantastic base for gourmet grilled cheese sandwiches, adding an aromatic dimension to a classic comfort food. For breakfast or brunch, slices can be toasted and served with eggs, avocado, or alongside a charcuterie board. The subtle rosemary notes also make it a surprisingly good pairing with lighter fare, such as grilled fish or chicken dishes. Don’t underestimate its potential as a standalone snack; a warm slice of rosemary bread is a delightful treat on its own.
Storing this super easy rosemary bread machine bread is straightforward. Once cooled completely, it can be stored at room temperature in an airtight bread box or a sealed plastic bag for 2-3 days. If you plan to store it for longer, freezing is an excellent option. Slice the cooled loaf and wrap individual slices or half loaves tightly in plastic wrap, followed by a layer of aluminum foil or a freezer bag. Frozen bread can last for up to 2-3 months. To reheat frozen bread, simply toast individual slices or warm a larger portion in a low oven (around 300°F or 150°C) until heated through. For a freshly baked aroma, you can lightly mist the loaf with water before reheating in the oven. If your bread becomes slightly stale, don’t discard it! Stale rosemary bread is perfect for making breadcrumbs or croutons. Simply cube the bread, toss with a little olive oil and herbs, and bake until golden and crispy. These homemade rosemary breadcrumbs can then be used to coat chicken or fish, or to top casseroles.
The simplicity of this super easy rosemary bread machine bread recipe makes it an ideal entry point for novice bakers, while its exceptional flavor profile ensures it will be a staple for experienced home cooks as well. The bread machine removes the intimidation factor often associated with yeast breads, allowing anyone to produce a consistently delicious and aromatic loaf with minimal effort and maximum satisfaction. The aromatic essence of rosemary infuses the bread, creating a sophisticated yet approachable flavor that complements a vast array of culinary creations. From its humble beginnings of flour, water, and yeast, this recipe transforms into a masterpiece of convenience and taste, proving that gourmet results don’t always require extensive time or skill. Embrace the ease, savor the aroma, and enjoy the unparalleled pleasure of homemade rosemary bread, baked to perfection by your trusty bread machine.
